A large percentage of the population has tight hip flexor muscles as a result of poor posture, faulty biomechanics, sitting too much and/or stress.1, 2, 3 Learn from The BioMechanics Method (creators of the the fitness industry’s highest-rated Corrective Exercise Specialist certification) how tight hip flexors cause lower back pain, knee pain, ankle and foot pain.
What Are the Hip Flexors?
The hip flexor muscles are a group of muscles (psoas major, psoas minor and iliacus) that originate on the front of the spine and pelvis, cross the front of the hip and attach to the inside of the upper leg (see Figure 1).3
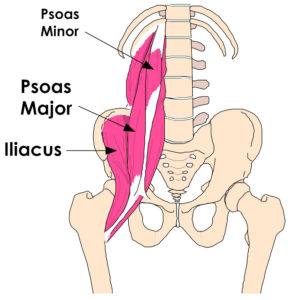 Figure 1: The Hip Flexors
What Do The Hip Flexors Do?
These muscles help bring the leg towards the spine when they contract (i.e., flex the hip) and allow the leg to travel behind the body when they lengthen.2 They also help stabilize the upper body on top of the lower body during all weight-bearing movements like standing, walking and running.3
How Do Tight Hip Flexors Cause Back Pain
Constant and prolonged hip flexion from sitting all day can cause restrictions in this group of muscles.2 This can make them chronically tight which can prevent the leg from travelling behind the body correctly (such as what is needed when walking and/or running). When this happens other areas of the body compensate such as overarching of the lower back (Figure 2).2
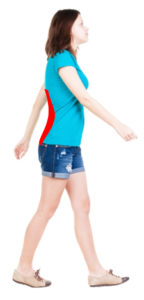 Figure 2: Tight Hip Flexors Causing the Lower Back to Overarch
Similarly, common postural and movement imbalances such as flattening of the feet (i.e., overpronation) and/or knocked knees can rotate the ankle and leg inward, rather than allowing them to travel behind the body correctly. This disruption in the movement of the legs leads to further hip flexor dysfunction altering movement patterns and over time resulting in pain to the feet, ankles and knees.2,3
Exercises for Tight Hip Flexors
Massaging and stretching the hip flexor group of muscles will help improve their function, your posture, decrease stress and prevent aches and pains associated with hip-flexor tightness. Utilize the exercises below to help address these issues.
Massaging the Hip Flexors
Begin your hip flexor rehabilitation program with this self-massage technique using a foam roller. If you don’t have a foam roller you can use a tennis ball instead (see second picture).
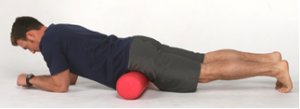
Place the roller perpendicular to the front of your body and lie over it at hip level. Find a sore spot on the front of your hips and hold your bodyweight on it for a few seconds to help your muscles release. Move your upper body to roll the roller to different sore spots on the upper leg keeping your abdominals engaged to ensure that your lower back does not arch too much. Roll for 30 seconds to 1 minute on each side at least once per day.

Because the psoas muscles of the hip flexor group originate on the lumbar spine you can also place the tennis ball beside your bellybutton to help loosen up these muscles specifically. Move the tennis ball to each sore spot you find and hold it there for 10 to 30 seconds. Do each side of the body for a total of 2 to 3 minutes at least once a day.
Stretching the Hip Flexors
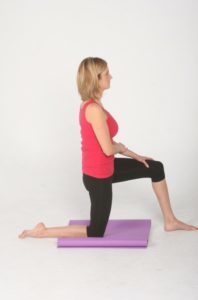
Stretching the hip flexors in this kneeling position is a great way to help encourage the hips to move forward under the spine so that your lower back does not have to overcompensate by arching excessively to take your leg behind your body.
Kneel with one leg in front of the other. Try to tuck your hips under until you feel the glutes of your kneeling leg contract. Keep the torso upright without arching your lower back excessively. Hold for 30 seconds each side. Do once per day. (Note: The woman in the picture is stretching her right hip/leg).
Stretching The Hip Flexors with The Whole Body
This next stretch is a progression from the kneeling hip-flexor stretch shown above as it integrates other parts of the body. This stretch addresses tightness in the hip flexors, but also in the calves, abdominals and shoulders to help coordinate correct movement and an upright posture all the way from the feet up to the head.
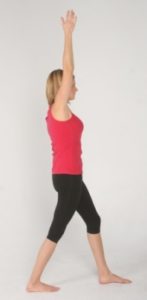
Step back with the right leg while raising the right arm over your head. Make sure both feet are facing forward and the hips are tucked under. Do not overly shrug the shoulder of the arm being raised. Complete the movement on the right side by stepping forward with the right leg while bringing the arm down then step backward with the left leg and raise the left arm to complete the movement on the left side. Repeat on both sides 3 – 5 times at least once per day.
Incorporating corrective exercise techniques to loosen up the hip flexor muscles (such as those detailed above) into both your daily life and workout program will keep them flexible and your lower back, knees, ankles and feet stress and pain free for years to come.
Fitness, exercise and health professionals interesting in learning more about anatomy, and how muscles and other soft tissue structures affect pain and dysfunction, should check out Module 2 (i.e., Understanding Muscles and Movement) of The BioMechanics Method Corrective Exercise Specialist certification program or by clicking on the link below.
References:
1McGill, S. 2016. Low Back Disorders: Evidence-Based Prevention and Rehabilitation. 3rd ed. Champaign, IL: Human Kinetics.
2Price, J., and M. Bratcher. 2018. The BioMechanics Method Corrective Exercise Specialist Certification Program. 2nd Ed. San Diego, CA: The BioMechanics Press.
3Price, J. 2018. The Biomechanics Method for Corrective Exercise. Champaign, IL: Human Kinetics.
