In this blog you will learn how to assess and improve trunk rotation – one of the most common movement dysfunctions that can cause pain and limit potential. You will also learn techniques you can employ to correct this problem and help both yourself and your clients feel and function at their best.
Why is Trunk Rotation Important?
Sufficient trunk rotation is essential for the pain-free performance of any type of dynamic movement or sporting activity. For example, walking, running and playing most sports all require trunk rotation to help keep the body balanced, generate momentum and swing the arms to throw or hit a ball, etc. However, since many people have some degree of immobility in their trunk, rotational stress generated during dynamic movements shifts to other structures of the body, like the lower back, hips, knees, ankles, shoulders and neck. Overtime this increased stress can lead to pain and/or dysfunction to these other areas.1
How to Assess Trunk Rotation
The following assessment is designed to assess how much the trunk can rotate. It is a quick and easy strategy to use with yourself and your clients before, during and after regular exercise sessions and/or sports to assess and improve trunk rotation.

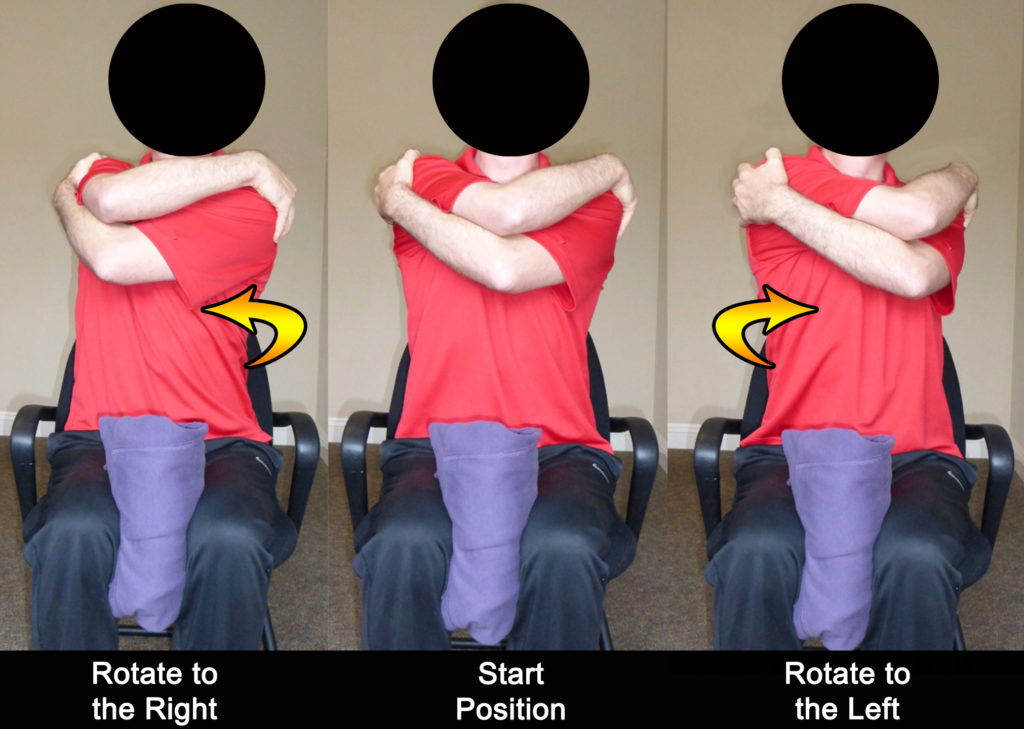
Sit on the edge of a chair with a pillow or mat squeezed between your knees. Hug yourself so your arms and shoulder blades are locked into a fixed position. This will ensure you do not “cheat” the assessment by trying to move your arms and shoulder blades. Now rotate to the left without bending your spine to the side. Sit in front of a mirror if you are unsure if you are side bending as you rotate.
If you lack trunk mobility as you rotate to the left, your right knee may want to come forward (or left if rotating to the right) in an effort to achieve movement by rotating your lower back and hips forward instead of your torso. If you notice this cheat, squeeze the mat or pillow between your knees harder to prevent this undesired movement. Once you have completed the rotation to the left, return to the start position and rotate to the right. Again, check that your shoulders are level and you are not bending to the side to try to “cheat” the movement. Ideally, you should be able to rotate about 50° in either direction.
As you perform the assessment evaluate which way you found more difficult to turn, or if both directions were difficult. If it is not obvious to you during the assessment, you can also check if when you turn one way you find it more difficult to breathe, while when turning in the other direction you can breathe normally. If your breathing is restricted when turning in one direction, this means it is difficult for you to turn that way and the muscles around your trunk are tight. Also, if your knees have a tendency to come forward a lot during the assessment, or you bend to the side, this can help you gain insight into the inability your trunk has to rotate in that direction.
Corrective Exercises to Improve Trunk Rotation
An effective corrective exercise program including self-myofascial release (SMR) and stretching exercises can help improve trunk rotation. Your program should begin with a warm-up focusing on self-myofascial release techniques of the obliques and hip-flexors.2 Once these SMR exercises have been completed you can progress to the two stretching exercises detailed below.3,4
Doorframe Stretch:
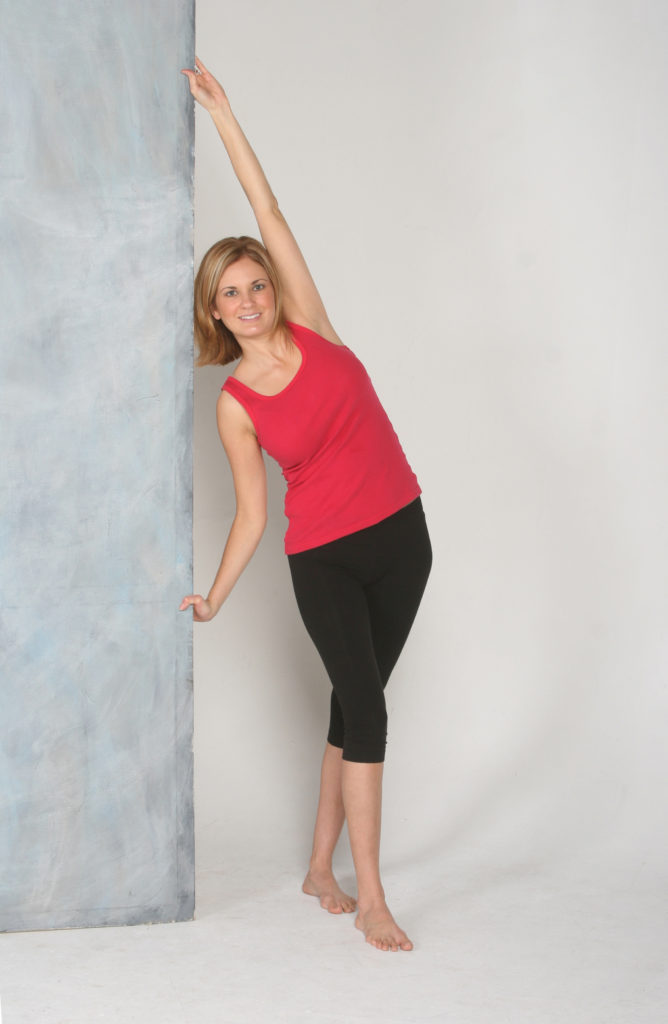
This exercise addresses the front and sides of the trunk. Stretching the abdominals and lateral muscles of the torso will help free up the trunk so that it can rotate with ease.

Stand in the middle of the doorway and grab the right side of the doorframe as you push your left hip away from your outstretched arms. Tuck your left foot behind your right foot to increase the stretch into the left hip. Keep your torso upright and do not round your spine forward as you perform this stretch. Repeat stretch on both sides of the body.
Wall Rotation Stretch:
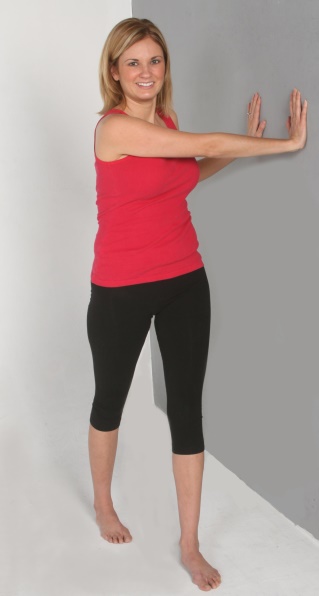
This exercise increases the ability of the trunk to rotate. The split stance position of the feet in this stretch will also help open up the hips helping improve trunk rotation.5

Stand about 12-18 inches away from a wall on your left-hand side. Place your left foot forward and right foot back with your feet straight. Rotate your torso to the wall and use your hands to create more rotation. You should feel this stretch on the front of your hip of the leg that is back and around your torso. As you are performing this stretch, you may notice your hips move and/or your spine bend to the side in an effort to “cheat” the movement. You can correct these cheats by pulling your right hip back gently as you rotate your torso left (and vice versa if performing this stretch on the other side). Repeat stretch on both sides of the body.
Conclusion
Learning how to assess and improve trunk rotation is an essential skill to help people achieve optimal movement and stay pain-free. Applying these skills to both yourself and your clients’ programs will help target the underlying causes of musculoskeletal pain and dysfunction both immediately and for many years to come.
To learn more assessments and corrective exercises to help both you and your clients feel and function better check out the industry’s highest-rated Corrective Exercise Specialist certification for exercise, fitness and health professionals from The BioMechanics Method.
References
1Price, J. 2019. The BioMechanics Method Corrective Exercise Educational Program (2nd Edition). The BioMechanics Press.
2Price, J. (2018). The BioMechanics Method for Corrective Exercise. Champaign, IL: Human Kinetics.
3Golding, L.A. & Golding, S.M. (2003). Fitness Professional’s Guide to Musculoskeletal Anatomy and Human Movement. Monterey, CA: Healthy Learning.
4Rolf, I. P. (1989). Rolfing: Reestablishing the Natural Alignment and Structural Integration of the Human Body for Vitality and Well-Being (revised edition). Rochester, VT: Healing Arts Press.
5Myers, T. (2001). Anatomy Trains. Myofascial Meridians for Manual and Movement Therapists. Edinburgh: Churchill Livingstone.
